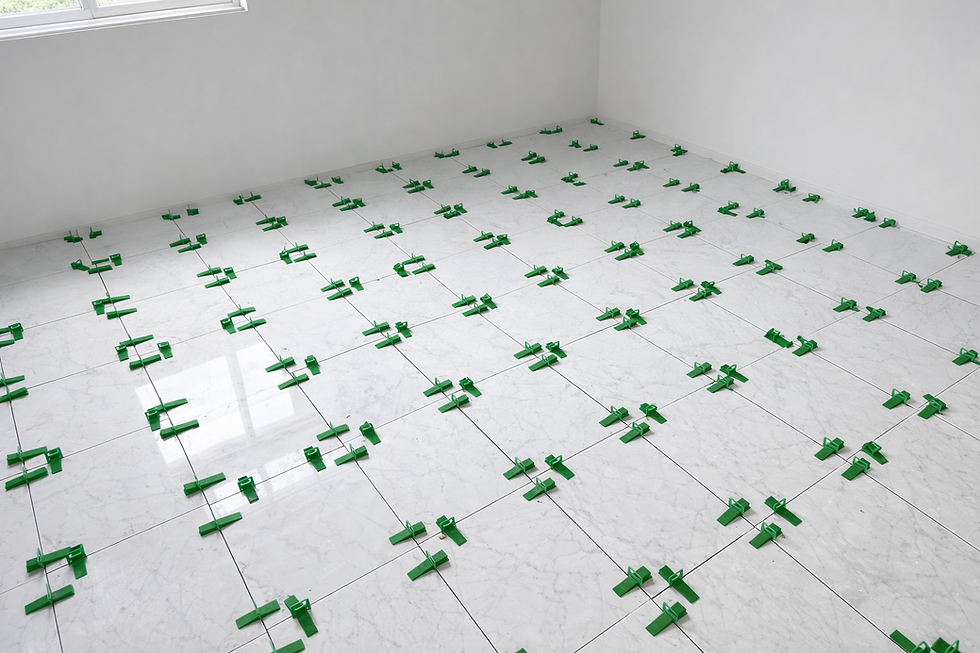
Tile Leveling Clip Calculation: Tile Installation with tile leveling System
- EASY LEVEL Editorial Team

- Apr 22
- 4 min read
When it comes to Tile Installation with tile leveling System, precision is everything. One small misalignment can lead to uneven surfaces, lippage, and ultimately, unhappy clients. That’s why tile leveling clips have become a game-changer for professionals like us. But here’s the million-dollar question: how do you calculate the right number of tile clips to use for any given project? Today, I’m breaking down the tile leveling clip calculation process to help you nail every job with speed and accuracy.
Understanding Installation with tile leveling System
Tile leveling clips are designed to keep tiles perfectly aligned during installation, preventing uneven edges and ensuring a smooth, professional finish. But using too few clips can cause tiles to shift, while using too many can waste time and materials. So, how do you find the sweet spot?
The key is to consider several factors:
Tile size and shape: Larger tiles generally require more clips.
Tile thickness: Thicker tiles may need specialized clips.
Surface type: Uneven substrates might require additional support.
Project scale: Bigger jobs demand efficient clip usage to save time.
A basic rule of thumb is to place clips at every tile corner and along the edges where tiles meet. For square or rectangular tiles, this usually means four clips per tile, but it can vary.
Step by Step Tile Clip Calculation
Measure your tile dimensions: Length and width in inches or millimeters.
Determine clip placement: Typically, clips go at every corner and sometimes mid-edge for larger tiles.
Calculate total clips per tile: For example, a 12x12 inch tile might need 4 clips, but a 24x24 inch tile might require 8 or more.
Multiply by the number of tiles: This gives you the total clips needed for the project.
Add a buffer: Always order 10-15% extra clips to cover breakage or miscalculations.
By following this method, you can avoid costly delays and ensure a flawless finish every time.
How Many Tile Spacers Per Tile?
While tile leveling clips handle height and alignment, tile spacers control the grout joint width. Knowing how many spacers to use per tile is just as important for a clean, consistent look.
For most installations:
Small tiles (under 6 inches): Use spacers at every corner and mid-edge, totaling 8 spacers per tile.
Medium tiles (6 to 12 inches): Spacers at each corner and mid-edge, about 8 spacers.
Large tiles (over 12 inches): Spacers at corners and every 6-8 inches along edges, which can mean 10 or more spacers per tile.
Spacing depends on the grout joint width you want, typically between 1/16 inch and 1/8 inch for professional finishes. Using the right number of spacers ensures uniform grout lines and prevents cracking.
Pro Tip
For large-format tiles, combining tile leveling clips with the correct number of spacers is essential. The clips keep the tiles flat, while spacers maintain consistent gaps. This combo reduces callbacks and rework.

Factors Affecting Tile Clip Quantity
Not all projects are created equal. Several variables can influence how many clips you’ll need:
Tile Thickness and Material
Thicker tiles, like marble or travertine, require heavier-duty clips. EASY LEVEL SYSTEM offers clips up to 35mm thick, perfect for these materials. Using the right clip size ensures proper pressure and leveling without damaging the tile.
Tile Size and Format
Large-format tiles (24x24 inches and above) need more clips per tile to prevent sagging or unevenness. Smaller tiles require fewer clips but more spacers.
Substrate Condition
Uneven or rough substrates may require additional clips to maintain levelness. If the surface isn’t perfectly flat, more clips help compensate for irregularities.
Installation Speed and Crew Size
High-volume installers benefit from calculating clip needs precisely to avoid running out mid-job or over-ordering. Efficient clip use speeds up installation and reduces waste.
Practical Example The Old Way vs. The Smart Way
Let’s say you’re installing 12x24 inch porcelain tiles over a 500 sq ft area.
The traditional way requires multiple steps:
Calculate tile coverage
Estimate tiles needed
Define clips per tile
Multiply everything
Add extra for waste
You might end up with something like 1,725 clips after all the math.
But here’s the point:
👉 Instead of spending time calculating, just use the Smart Clips Calculator.
In seconds, you get an accurate estimate of:
Required clips
Required wedges
Built-in waste margin
No guesswork. No wasted time. No risk of underordering.
Where to Find Reliable Clip Calculators and Resources
If you’re wondering how many tile leveling clips do i need for your next project, EASY LEVEL SYSTEM provides an excellent online calculator and detailed guides. These tools help you quickly estimate clip quantities based on tile size, thickness, and project area.
Using these resources saves time and reduces guesswork, especially on large or complex jobs.
Maximizing Efficiency with the Right Clips
Choosing the right clip size and quantity isn’t just about numbers. It’s about improving workflow and final results. Here’s how:
Use clips designed for your tile thickness: Avoid damage and ensure proper leveling.
Plan clip placement before starting: Map out clip locations to speed up installation.
Train your crew on clip usage: Consistency reduces errors and callbacks.
Order from suppliers with fast delivery: Avoid downtime waiting for materials.
EASY LEVEL SYSTEM’s wide range of clip sizes and fast shipping options make it easy to keep your projects moving smoothly.
Final Thoughts on Tile Leveling Clip Calculation
Getting your tile leveling clip calculation right is a cornerstone of professional tile installation. It saves time, reduces waste, and guarantees a flawless finish that clients will love. Whether you’re working with porcelain, marble, or large-format tiles, understanding how to calculate and use clips effectively is a skill that pays off on every job.
Remember, the goal is precision and efficiency. Use the tips and examples here to plan your next project with confidence. And if you ever need a quick reference, don’t hesitate to check out the EASY LEVEL SYSTEM resources for expert guidance.
Happy tiling!


Comments