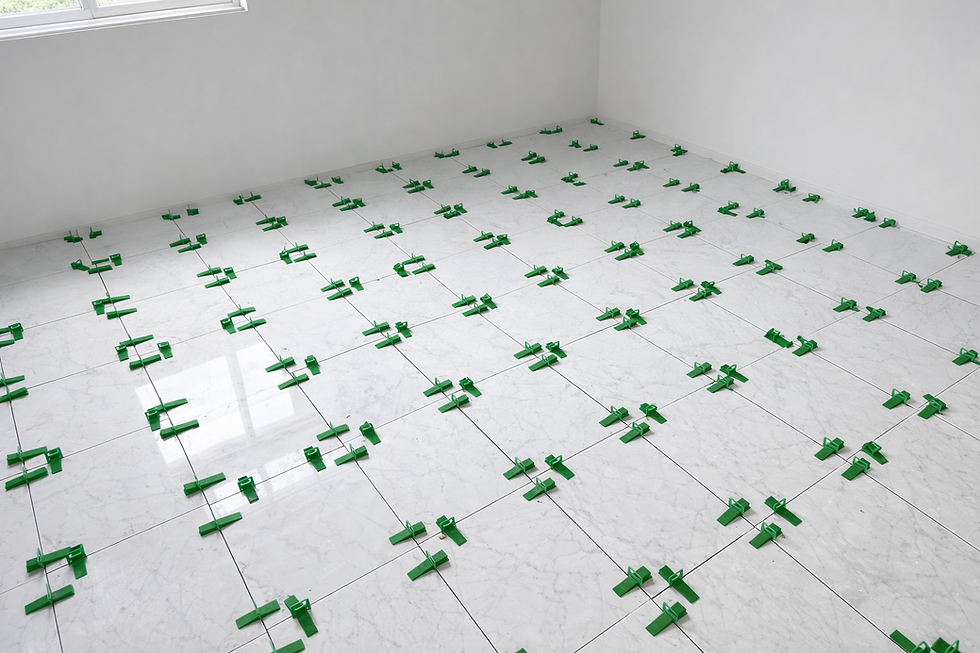
How to Accurately Calculate the Number of Tile Leveling Clips for Your Project
- EASY LEVEL Editorial Team

- Jan 21
- 3 min read
Achieving a flawless tile installation goes far beyond choosing the right tiles. One of the most common challenges—both for professionals and DIY installers—is estimating the correct number of tile leveling clips needed for a project. Ordering too few can cause delays, while ordering too many increases unnecessary costs.
This is where a tile leveling system calculator becomes an essential planning tool. When used correctly, it helps reduce waste, optimize costs, and ensure a smooth, professional finish.
Why Estimating Tile Leveling Clips Is Often Miscalculated
Many installers still rely on generic tables, rough estimates, or “rules of thumb” to calculate leveling clips. While these methods may work in small projects, they often fail when tile sizes, layouts, or grout joints vary.
Key factors that directly affect clip quantity include:
Tile size and shape
Total installation area
Grout joint width
Installation pattern
Tile layout orientation
Ignoring any of these variables can lead to inaccurate estimates.
What Is a Tile Leveling System Calculator?
A tile leveling system calculator is a digital tool designed to calculate the number of leveling clips (and wedges) required for a specific tile installation. Instead of relying on static tables, a proper calculator uses mathematical formulas that consider real project variables.
By processing these inputs, the calculator provides a more precise estimate, tailored to your project—not an average assumption.
How a Tile Leveling Calculator Works
Most calculators require the following information:
Tile length and width
Total area to be tiled
Grout joint width
Tile layout pattern
Type of leveling system used
Based on this data, the calculator determines how many tile intersections exist—and how many clips are required to properly level the tiles during installation.
Unlike pre-made charts, formula-based calculators adapt to each project, making them significantly more reliable.

The Advantage of Formula-Based Calculations Over Tables
Many online resources still offer clip estimation using fixed tables (for example: “X clips per square meter”). While convenient, these tables do not account for:
Different tile proportions
Narrow or wide grout joints
Non-standard layouts
Large-format tiles
A growing number of professionals prefer smart calculators that use real formulas instead of averages. One example is the Smart Calculator available on the EASY LEVEL system website, which calculates clip quantities dynamically based on project-specific inputs.
This approach reduces overbuying and minimizes the risk of running short during installation.
Step-by-Step: How to Estimate Tile Leveling Clips Correctly
Step 1: Measure Tile Dimensions
Measure the exact length and width of your tile, including any variation between batches.
Step 2: Calculate the Total Area
Determine the total square footage or square meters of the area to be tiled.
Step 3: Define the Grout Joint Width
Grout spacing directly affects how many tiles—and intersections—fit into the area.
Step 4: Use a Formula-Based Calculator
Enter your project details into a calculator that adapts the math to your inputs. Tools like the EASY LEVEL Smart Calculator are designed specifically for this purpose.
Step 5: Add a Safety Margin
Even with accurate calculations, it’s recommended to add 5–10% extra to account for waste or breakage.

Common Mistakes When Calculating Tile Leveling Clips
Even experienced installers can miscalculate if they overlook key details:
Using nominal instead of real tile dimensions
Ignoring grout joint width
Relying on generic tables
Forgetting layout pattern changes
Not accounting for waste
Using a calculator that adjusts dynamically helps avoid most of these issues.
How Technology Is Improving Tile Installation Planning
Modern tile installation increasingly relies on digital planning tools. Online calculators now offer:
Instant results
Custom project inputs
Better material planning
Reduced job-site interruptions
Some platforms also allow users to revisit calculations or adjust inputs quickly if the project scope changes.
The EASY LEVEL system website, for example, provides a calculator built around a unique calculation formula, offering higher precision compared to static estimation charts commonly found online.
Final Thoughts
Estimating the correct number of tile leveling clips is a critical step in any tile installation project. Relying on guesswork or generic tables often leads to wasted time and materials.
By using a formula-based tile leveling system calculator, installers can plan more accurately, reduce costs, and achieve better results. As tile formats become larger and installations more demanding, smart planning tools are no longer optional—they are essential.
Choosing the right calculator can make the difference between a smooth installation and unnecessary complications.


Comments